December 20, 2010

Exciting News & A Christmas Card !


I have some very exciting news that I have been wanting to share, and today I can finally spill the beans lol. I am now a proud member of the Squigglefly Design Team!!! This is so exciting for me and I am looking so forward to all the fun and excitement. I hope you guys join in the fun as well.


If you are not familiar with Squigglefly, click HERE to check them out. Here are just a couple of great features that Squigglefly offers...

  • When you sign up for Squigglefly rewards it keeps track of your purchases and for every $15.00 you spend you earn a free image! You can redeem the free image whenever you want.
  • Squigglefly doesn't let your download links expire! this is important because if your computer crashes, contact Squigglefly with your email address and they send your download links so you can retrieve all the images you have purchased from them!
I also created this Christmas card using the Best Buds image that I thought was just adorbale. My Design Team obligations start in January, but I just couldn't help myself.


I created the sentiment on my computer. I hope you guys like, and thank you so much for visiting. Stay tuned as there is a lot more fun stuff in store.

Challenges will begin on January 10th and I hope you all decide to come play along with us. Want to join in the fun? You can use any Squigglefly image to participate. Head on over to the shop, or check out our freebies so you can play along too!

I hope everyone has a wonderful Holiday!

December 19, 2010

Stay Tuned......


I have some really exciting news!!! Please come back tomorrow on December 20th and I will spill the beans lol :)


There will be lots of fun and exciting things that will be happening and I can't wait to share!

Stay tuned...

November 17, 2010

a small project


Hi everyone!!

I know it's been a long time since I have posted, but I have an extremely CRAZY Holiday Job that is going to keep me occupied til January. I won't be going anywhere as I have some awesome announcements coming in 2011 - I'm so excited!!!


Today I wanted to share a small project I just completed. I'm not sure if any of you are familiar with LUSH. It's an awesome place where you can purchase bath bombs, bubble bars and so much more. It's all handmade items and I have been hooked for some time now. I can no longer take a bath with plain ole clear water anymore lol. I need my pink sparkly scented water and my bubbles!!! If you want to check them out you can at www.lushcosmetics.com. They will provide you with an awesome bath experience you will never forget.

Well since there are so many products to try, I wanted to create a notebook where I can list each item I have tried, and if I liked it or not. I altered a plain ole composition book. This is a super cheap and super easy way to make a cute gift. I got my notebook at the Dollar Store for 1$, and I believe during Back to School time you can find them even cheaper than 1$.

Here is the book BEFORE :)


and this is after I altered it :)


I'm really pleased how cute it turned out. I copied the company logo on my photo copier so I could transfer it to cardstock. I then used green and yellow stickles to add some bling! I used an old Fiskers border punch and added blingy Rhinestones to it as well. Now I have a bath time journal that I can record all my thought in!

Here is a close up.


Thanks for visiting and I'm hoping to pop out some Christmas cards before it's too late lol. I also hope for those that celebrate it, A very HAPPY and Fruitful Thanksgiving.

August 28, 2010

Free Stuff - WOOOHOOO :)


Free Copics, Free Card Making stuff...Free anything you like. Hmm that sounds too good to be true, well it's not!

Okay I know a lot of you have heard you can make money online, but it always turns out to be a scam. Well, I found something that isn't :) It's called Swag Bucks. This is totally not a scam - I'm an everyday person like the rest of you and I would never do anything scammy in any way. I use this and it's for real. My friend started me. At first, I was VERY VERY hesitant, but once I realized it was a legitimate thing and a sort of fun online community of people of thousands, I was hooked :) You use there search engine and you earn points for money. That's it.

I started Swag Bucks about 7 days ago, and I already got a 5$ PayPal Gift Certificate and a 10$ Amazon.com Gift Certificate, for doing nothing that I normally don't do anyways - search on the internet lol. All you do is use there search engine 3 times a day (once in the morning, once in the afternoon and then once at night) and you get rewarded with Swag Bucks that you can turn around and trade in for Gift Cards for Amazon.com and Paypal (and tons of other places too)....How cool is that!!!

I am wanting new Copic Markers and since I can't afford them as of now being unemployed, I'm going to save up my Swag Bucks for them (and some nail polish too lol). I'm going to cash them in for Paypal $'s that I can then use to buy Copics (or anything else you want). Like I said I've gotten 15$ dollars and I have only been using it just about a week :) Copics and Nail Polish here I come LOL.

Or..... if you don't cash out right away, some just save up there points for the whole year and then cash them out for Xmas. It's like having your own little Xmas fund building, for just searching the internet. You can not beat that, and to me a free dollar is a free dollar. I average about 100 Swag Bucks a day and a PayPal 5$ card is 700 Points and an Amazon.com 5$ is 500 points. I'm just going to let mine collect up again and just go crazy on my free shopping spree :)

If you want to sign up, please use the Swag Bucks link in my left sidebar. If you sign up with that link you will receive 30 free Swagbucks to start with. Yes I do get extra points for having sign ups (I'm being honest about that), but that's the whole point. We all work together to get points. Having friends join your account is the fun part.

My favorite part is the Codes :) Every day they release a code, but you have to figure it out. I love the treasure hunt and I have meet so many nice people on there Facebook and Twitter accounts. They post hints on there Blog, Facebook and Twitter and then it's like a big treasure hunt for all us to go figure out the code of the day. Sometimes they have more than one code a day. If you are too busy for that - they have spoiler sites that just give you the code. I do a little of both hehehehe. Plus there are tons of other ways to collect Swag Bucks each day. All kinds of fun ways.

If you have any questions you can email me at diana.genario@gmail.com and I can provide you tip sand tricks and all the websites you will need to get things done in just a few minutes a day. It took me a bit to get the hang of it, but once I started I was addicted. I WANT FREE COPICS lol. Just using the site 3 times a day for a few minutes and checking my emails for code alerts I have gotten lots in just a week. At this rate I should be able to have my Copics in a couple of months - How cool is that!!!!!

If you would like to try it out and get as addicted to it as I am LOL and get yourself some free Card Making/Scrapbooking supplies, just click the link in my left side bar and off you. GOOD LUCK!!! My link will start you off with 30 Swag Bucks and you will be off to races.

August 14, 2010

MOJO 151 - Taken in The Sun with some Mojo


It's a Mojo Monday 151 card today!!! A little late, but not too late lol. It's my first time doing a Mojo challenge, so I'm excited about it. I used C.C. Designs: Sugarplums Polka Dot Emma from All That Scraps. I finally got around to using her. I colored this with both Copics and my Prismas.


Here is the sketch to follow:


The soak up the sun sentiment is from My Favorite Things, Hit the Beach set. It went perfect with my sun :) which I created with various punches. The shells is a stamp form Micheal's Dollar Stamps (love those things - they are perfect for adding accents to cards just like I have done here). I paper pieced the shells and added some Stickles for some bling. Here is a close up.


The flower is from Prima - gotta love those frosted flowers, they added just the right touch. I also added a button and a rhinestone to finish if off!


Thanks for visiting and I hope you are all having a great weekend!

August 13, 2010

Are you a Magnet :)


Hi Everyone!


This was created for this weeks Club Anyas Whats Tootin' Wednesday where the fabulous Kim came up with an awesome idea to make magnets! Kim posted a great tutorial that can be found HERE. There are several ways to create one, I used Crystal Effects for mine with a few changes. I added a step by step instructional below of my version.

I created a Nurse magnet so I can stick my cats vet appointment cards to the fridge lol.


How cute is this!!! It's also great for Doctor/Dentist Appointment cards too. Stick them to the fridge and don't forget those important appointments ever again :)

I added stickles to the nurses hat and a rhinestone, as well as a little band-aid to the corner. I never have use for those little band-aides, they are always too small for cuts LOL. All the items are under the Crystal Effects. I colored the image with my Prisma Color pencils and OMS. Here is a close up of the Magnet.


The stickles are so sparkly under the Crystal Effects.


I needed to alter Kim's Tutorial some as I didn't have all the supplies. Here is what I did.

STEP by STEP Instructions:


* Start with a piece of cardstock and stamp your image with Momento Tuxedo Black ink.

* Color your image, (I used my Prismas), and then crop the image just to show what you need. Please note, if you use Copics all dark colors like black, Navy and Red ran on me once the CE was applied. I had no smearing with my Prismas.

* Glue the image to chipboard and allow it to dry over night. Make sure you really glue this well with a thick layer of glue to make sure there are no gaps between your chipboard and cardstock. I even weighted mine with a heavy object to make sure there was a really nice seal and allowed it to dry overnight.

* Once everything is dry, lightly sand the edges to make it smooth.

* Decorate your image as you like. I added Stickles, a rhinestone, and a band-aid hehehe (so cute!). Allow this to completely dry (overnight again if needed).

* Layer your Crystal Effects on the entire image. Make it a thick coat, but not too thick. If you get any air bubbles just use a safety pin to pop them, but this has to be done while the CE is still wet. Dry overnight.

* Finally, add your magnet strips to the back and glue them in place with CE as well - even if they are already self sticky.

If you have any questions please just let me know. I had a blast making this. I hope you guys like it too :) Thank you for visiting.

August 10, 2010

A Little Button Happy


Hi everyone!

Today I did a card for Monday Mania over at Club Anya. It's Sheng's turn this week and she decided on buttons! It also qualifies for Pixie Dust Studio's Cute as a Button challenge (yah yah yah) AND WT276 (Heat Embossing) at SCS.

I created an Easel Card, but incorporated the button theme. I have seen these Easel cards popping up all around blogs, so I had to give it a try - but I gave mine a little twist and made it a shape Easel Card. I used my Cricut and Sure Cuts A Lot to create the base. Can you see the buttons?


I'm really happy with the results. First I did a faux leather look on some of the card stock. It came out better than I expected. I added a close up below so you can see the faux leather up close.


It's actually pretty easy. I copied down the steps in case anyone was interested in reproducing it.

1. Start with a brown piece of card stock

2. Emboss it with the Mosaic Embossing folder

3. Use Tim Holtz Distressing in any of the browns and distress it randomly over the entire piece. Darker in some spots and lighter in others.

4. Rub the entire surface with a Versamark clear embossing ink pad. Do not press too hard as you just want to cover the raised portions and not the lower parts inbetween.

5. Cover it with clear embossing powder tapping excess off. Again look to make sure the embossing powder is on the raised pieces only.

6. Heat with a heat gun

Viola - Instant faux leather :)


As I mentioned earlier, I stuck with the challenge to use buttons, I hope you can see the pretty flower buttons I used :) I also paper pieced Anya's outfit with a bandanna pattern and blue jean patterned designer paper.


I have to say this is one of the best cards I have ever made from pre-planning. So many times I get a thought in my head to make a card, but when I sit down to do it - it doesn't work out. This card came out so much better than I pictured it in my head when planning, and that usually never happens lol.


I hope you guys like it. Thanks so much for your visit!

August 8, 2010

Happy Halloween - Already??


Yes, already in August lol. I love Halloween and I always make a ton of cards this time of year or at least I try to. I did this card for this weeks Farm Fresh Friday
Sketch over at The Greeting Farm, and here is the card I came up with.


Here is the Sketch for this week
.


The skeletons on the background paper where stamped in black and then clear embossed. It is hard to see in the picture, but they are very shiny. I used a ton of different Tim Holtz Distress Inks for distressing all the edges of all the papers and the little pumpkin has a cute purple stickles outfit on.


I also used some of my flower soft :) YIPPEEE ....I covered the spider near the sentiment to make him look fuzzy lol. How cute is he?! Here is a close up of my furry friend.

I usually dislike all types of spiders but this one is so cute. I used an old spider shaped punch which has probably sitting in my stash for several years from my scrapbooking days. This punch must easily be 8 years old or maybe older lol. I then covered him in flower soft glue and then black flower soft. I'm really starting to love this stuff. I did buy the larger container of black and I can honestly say I will never have to buy black flower soft again - there is TONS inside the container.

Supplies:
Stamps: Inkadinkado Skeletons, The Greeting Farm Pumpkin
Clear Embossing Powder: Skeletons and Sentiment
Tim Holtz Distressing Inks: Peeled Paint - Vintage Photo and Spiced Marmalade
Stickles, Rhinestones
Flower Soft: Black

Thanks for visiting

August 7, 2010

TESC123 - Love is Toxic


Hi Everyone,


Today I decided I would tackle a Taylored Expression Sketch Challenge TESC123. The Sketch was really fun looking so I decided to give it a try :) Here is the card I created.


Here is a close up of the details.


I love the skull brad, I was so happy when I found it in my stash AND it matched. Don't you love when that happens lol. Here is the Sketch I followed.


I really love how my card turned out! Thanks for visiting.

Supplies:

Ink: Tim Holtz Destress Ink Fired Brick and Pink Copic for Heart
Paper: Rasic Gray Bitterweet 6x6 Paper Pad
Prima Flowers and Skull Brad
Teak Rhinestones and Black Pearls
Marth Stewart Drippy Goo Border Punch
Ribbon: A LOVELY free gift from Tamiko's Blog just for having her Blinkie showing on my page.

August 5, 2010

Book Worm and a Cricut Project


Hi Everyone!

Today I decided to play with my Cricut Expression. I picked up a new cartridge at CHA last week, Create-a-Critter, after I took The Pink Stampers Cricut class. They offered the supplies we used in the class for a seriously great discount when the class was over. I just couldn't pass it up the price was amazing. I totally LOVED Robyn and Carly and the class was so much fun. These girls just plain ROCK lol.

I just HAD HAD to use it today. Like most of you may be as well, I am a BIG bookworm. I love to curl up with a good book and a cup of tea and just get lost from reality :)
Now you ask, "How big of a bookworm am I" .....well....


BIG and that's not even all of them! I have about 300 books in total in my collection. What can I say, I'm a sucker for a good romance novel lol.

Since I purchased these shelves I have been contemplating cricuting them up, that's what I call it CRICUTING IT UP, PUMP IT UP :) and today I finally did it.


HOW CUTE IS THIS WORM!!!!!
I love him :) I used vinyl to cut all the pieces and then layered them. Once I was done layering all the pieces I applied the whole decal to the wood and then added some blingy rhinestones. The best part of these is if you ever tire of it, they peel right back off and do not harm the wood.


I love how it turned out! I found perfect fitting rhinestones for his antennas.


Here is a close up of the flower.


I used the Create-a-Critter Cricut Cartridge to create the Worm, Plantin School for the flower, and Sure Cuts A Lot to use my own computer font (Balloon) for the wording. The Vinyl I purchased in rolls at Lowe's when they clearanced out all there wallpaper (which occurred last year). They had GIANT rolls for 1.00$ What a deal! I picked up about 30 rolls in all different colors and I am so glad that I did.

I think I will add to this (that's why I started at the top of the space available) - I just haven't decided what. If I do add to it - I will of course show the pics here of the new look.

I hope you guys like this project as much as I do.


THANKS FOR VISITING!!!

August 4, 2010

CHA Chicago Video!


Hi Guys,


I finally got a lil video together from CHA. I had a blast and it was an awesome experience. I went for both Friday and Saturday (the Supershow) and so glad I did - there was a LOT to see. A lot of amazing things. There also was a LOT of walking hehehhe. I was exhausted after each day. I usually don't sleep well in Hotels and I was out cold each night HA.

I loved the Flower Soft Display. I got to sit and play with bowls and bowls of it and it's really amazing stuff. You will see me start incorporating it from here on out. I love it.

Cricut was neat :) The new Imagine is pretty impressive in action, and I had fun watching the Demos.

MFT was a great stop. I had a hard time deciding what to get without putting myself in the poor house LOL!! The only regret I had was I was hesitant on the rolled flower die-namic and when I went to finally get it - IT WAS SOLD OUT ----akkkkk lol.

I also enjoyed meeting Robyn and Carly from The Pink Stamper was so fun. They are so friendly and funny! I took her class and it was so much fun. Thanks to both of them for an awesome experience in the class.

But, My favorite stop was Taylored Expressions. I got to meet the DT group and I have to say they were the most genuine friendly women I ever met. They were all so sweet and so helpful. I also got to meet Sankari from the DT team and she was beyond lovely. She didn't hesitate to give me a big ole hug :) I felt like I was meeting a superstar lol. I actually got tears as I worship her work and it was so overwhelming to meet her face to face. Thank you Sankari for being such a pleasure to meet!

I threw together all my photos and made them into a video. I hope you guys enjoy it. Also, keep an eye out: my next post will be pictures of all that I bought.


August 1, 2010

Greeting Farms 2nd Anniversary Blog Hop


HAPPY ANNIVERSARY
to The Greeting Farm
Is everyone ready for a seriously outrageous and fun Blog Hop!!! We are celebrating the 2 year Anniversary of one of my Favorite Stamp Companies: The Greetings Farm!! If you came here first, make sure you visit the TGF Blog for a list of all the participants in this Hop. Have a great time and get ready for some awesome projects and some fun prizes too. On to the fun stuff. I'm actually in Chicago at CHA right now (probably on my way home) so I'm grateful for Blogger Autopost lol. I had a lot of mixed ideas for this Hop project as I wanted it to be really special, and then the best idea hit me. Since I was headed to CHA and I needed to tote along a ton of papers like my Hotel Reservations, Show tickets, Workshop Tickets, etc. I wanted it all organized so I created a folder ......


I used The Greetings Farm Showtime Stamp set for the inside of the folder. It was so perfect for this project.


I wanted a place where I could have the show times printed so I would always be aware of the Shows start and finish each day, since I will be there for both Friday and Saturday and of course a place for notes.


I also wanted a list of Vendors to visit. This isn't all the stops that I will be making, but these were the ones I wanted to make sure I did not miss.

The folder will be so useful, and I made sure to make it easy to toss into my bag and carry around :)

Thank you so much for visiting and please leave a comment if you can, I love hearing everyone's thoughts!

July 28, 2010

New Blog Design


Hi Everyone,


I finally decided to stop being lazy and I got around to changing my Blog look! YIPPPEEEE :) I was really NOT liking my old one and I wanted something that was a little more ME. I hope you guys all like it. If not PLEASE don't hesitate to say what you hate about it LOL.

July 17, 2010

BLOG HOP with the Farm :)


Hi Guys,

Some Exciting news - for you Greeting Farms lovers out there like myself, they will be having their (2) Two Year Anniversary - HOW EXCITING!!! and to celebrate in usual Splendid Greeting Farm's fashion they are having a Blog Hop. The best part - WE are all invited (anyone that wants to participate). There is a lot of fun and prizes planned so make sure if you are a Greeting Farm Addict like myself you check the deets out
HERE


THE GREETING FARM's TWO YEAR ANNIVERSARY Blog Hop!
When: SUNDAY, AUGUST 1st
7:00pm CST


of course I would not miss this for the world lol. I will be away in Chicago at CHA, probably on my drive home at this time, but thankfully with auto post and/or the use of my Iphone I will have my post up and ready on time so make sure you come back here to check out my project for the Hop. I have something really cool and special planned.

Hope everyone is having a great weekend!!!

July 14, 2010

SC289 - Congrats!


Hi All,


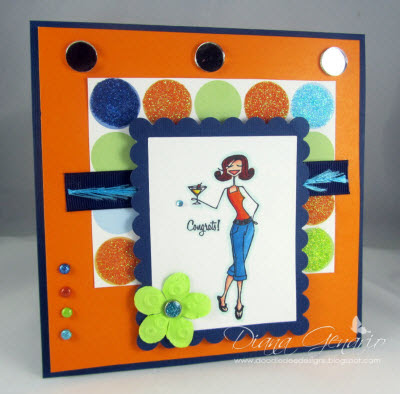
Tonight I'm bringing you the card I created for SC289 over at SCS. I actually struggled with this sketch ...ME? yes me, but I was determined and I'm happy with the final result. The struggle was my first attempt I went off memory and apparently that is not good thing to do HA. I re-tried (looking at the sketch while I was working this time) and it worked out fine. I decided to ink up my Cosmobella. I love coloring in Bellas, but today I went with my Copics. I currently only own about 12 Copic markers, but by the end of month My Birthday Fairy will be giving me a large set. *COUGH - COUGH* hint to my Birthday Fairy lol.


I used small mirrors for the top of the card. I purchased these from Hobby Lobby :) I also used Glitter on my Background DP to step things up for the Party. I didn't glitter all the circles, just a selected few. You can see them better in the closeup below.


Here is the original Sketch I followed from SCS.


The great thing about these sketch is that there is never a deadline, and you can submit yours at any time. I hope to have time in the future to go back over some older sketches that I missed.

Thank you for visiting!!!


July 13, 2010

SC288 - Sittin here thinking about you


Hi everyone :)


I recently placed an order with All That Scraps, and went a lil' overboard (hehehe) ordering stamps during the big sale they just recently had. I have always loved C.C. Design Stamps - the Pixies and Sugarplums. Well, I took the big dive and ordered a ton of them lol. Today I decided I had to ink up Swiss Lady Bug Nora. Isn't she just the cutest thing!!

I used sketch SC288 from SCS


I used both Copics (for the skin) and my Prismacolor Pencils for the coloring. I also used tons of stickles on this project (I couldn't help myself) :) The sentiment stamp is from AmyR's Underwater Sentiments, I love this set so much and so glad I got it while it was on sale.


I even stickled the Prima flowers lol and added a chipboard flower to the center (that I colored with my Copics)


Thank you for stoppin' in and visiting!

July 12, 2010

Your Next Stamp DT Call


Your Next Stamp is having a DT call :)


How cute and adorable are these stamps?!!! I have to try out for this team as I totally love there images. You can apply too - check it out HERE and make sure you follow all the required steps!

The cards I'm submitting for this DT Call are the following three :)


Second...


And Finally .....


Thank you so much for Visiting and Wish me luck guys!!

ShareThis