March 9, 2012

Fun Friday YNS - Making Planter Stakes


Today I have a super fun project for those gardeners like myself out there! And a great tip on how to use your Fancy Frame Die set to create them.

This is the time of year when I start planting up my vegetables for Spring. I start my seeds indoors, grow them for 2 months and then plant them outdoors come May when they are strong enough. 

Using the Your Next Stamp Fancy Frame Die Set - I created these... 


 This way I can easily identify my seedlings and make sure I am giving each the proper care before I plant them outside. 

On the back of the Planter Markers, I either have added the variety that I planted, or left the tag blank so I can write in when I planted them and the variety name.
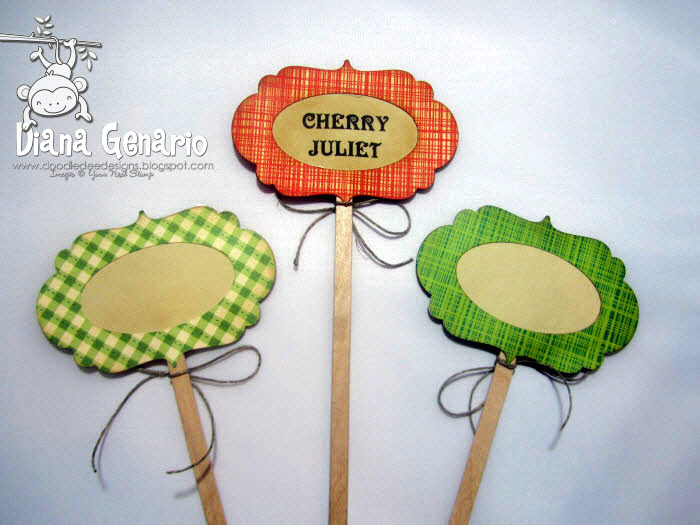


It makes planting seeds to create seedlings indoor a breeze.


If you are wanting to use these tags outside, you can simply laminate them to weather proof them. I will do so to mine once I move my plants outdoors and place them in there permanent planters.


These where so much fun to make. There are so many options once you get started. The hardest thing will be deciding how many you want to make lol.


I will be making at least 10 more of these for the remainder of my pots that I have started indoors.


Now in case you are not a gardener, have no fear. You can use these labels anywhere in your home. You can label jars, containers, shoe boxes, storage boxes and on and on. The possibilities are endless. 
Use that Fancy Frame for labeling just about anything!

Thanks for visiting today! :)

February 24, 2012

YNS Fun Friday - Stamp Storage


Hey Guys,

Today for Fun Friday I created the following card using Flower Fhiona.

 
I used SC373 for my layout. I added a little St. Patrick's Day twist to this card. Her original hair clips where hearts so I re-stamp the image and cut out a few extra hearts, and changed them into shamrocks :) 

I added tons of Stickles as always.


I also used the sentiment that came with this set. I love all sentiments that have the dream theme in them.


Today's tip is to show you guys how I store my Your Next Stamp Sets.  I purchased these boxes at The Container Store. 


 I absolutely love these boxes. They are so convenient and can be used for so many different supplies. Then when you place them in your storage shelves, desk etc, they look good!

The YNS Stamp Sets fit in just PERFECTLY. 


My large sets are placed into sandwich size Ziplock Bags. 


Then, I just fold under the extra piece. The smaller sets are placed in 4x6 protective photo pockets. I cut them down slightly to make a better fit. 

I lay the large sets across the top and the smaller sets along the bottom. It really does fit perfectly. I can stack 6 or 7 sets in each pile. That's a good 50 sets in just one box :) 

I have tried so many methods of storage, including binders, and this works best for me. I can easy flip threw the stacks and see exactly what I have. It makes it so easy to pick a set to use.  i hope you guys enjoyed today's post. What is your favorite form of storage? - I would love to hear about it. Leave it in the comments below.

Thanks for visiting and Happy Friday!

February 17, 2012

YNS Fun Friday - Embossing


It's another Fun Friday with Your Next Stamp. Today my Card is using the most adorable Fhiona Bad Hair Day Stamp Set.  I have been having a ton of bad hair days lately, so I thought this was perfect for today :)

I used SC372 for my layout. It's simple, but so effective when you are wanting to showcase a stamp. 


My tip for today is to not forget about embossing! I wanted to use the designer paper as my backdrop for the sentiment, but regardless of what ink I stamped with it was smearing. This particular DP has a smooth surface and makes it's difficult to stamp on. Instead of compromising, I decided to use embossing instead. Anytime you have issues stamping on DP with regular ink, this is your best alternative. This way you don't have to deal with any ink smearing.


I paper pieced her outfit to match the DP as well. Now I was able to use my Dp of my choice and not have to change things!


Make sure you check out the YNS Blog post for today to see all the other Fun Friday Cards and Tips and a chance to win free stuff. Details are on 

We are also have a great clear out sale at Your Next Stamp. Karen is doing a little early Spring Cleaning so make sure you check it out. We have items up to 87% Off !!

February 8, 2012

February New Release BLOG HOP for YNS!!!


Hey guys,

It's that time again for another New Release Blog Hop with Your Next Stamp!!! So exciting. I totally love Blog Hop day :)

Blog Hop Starts: Wednesday, February 8th at 3:00AM (EST) 

Blog Hop Ends: Monday, February 13th at midnight (EST)


****If you got here from Jen D's Blog then you are right on track. If not, no problem you can start at the beginning of the hop at Jenny's Blog ****


Hop Prize – We will be giving away one World Love Stamp Set. One of the YNS DT Members is a secret blogger, so you will have to comment on all the blogs if you want the best chance at winning. Karen will be posting the winner on the YNS Blog on February 14th.

 Hop Specials – Karen is offering 15% off your entire order. The online code is YNSFEB2012 (code valid until Feb 15th), so you have plenty of time to make your picks. She will also have some awesome bundle deals available so be sure to check out the YNS Bargain Bin while you are shopping! 

Today I am using Libby From Jamaica. Super adorable. 


I tried to stay true to Jamaica and picked their flag colors. The sentiment I created on my PC, but I did not make it up myself. The saying is actually an Essie Nail Polish color lol. I'm really big into nail polish and I have a gigantic collection, so this name came right to mind when I saw this stamp. It was a perfect match.


I added a bottle top and a heart! My honey is always making me crazy, and I thought this would be the perfect Valentine's Day card.


I added bling on her dress with stickles and some yellow pearls. Totally fun to color this image up. 

The next stop on this Hop is Maureen's Blog for aother fun project. The new stamps today are amazing and I hope you guys are having a fun Hop!

Thanks for taking time to visit.

January 27, 2012

YNS Fun Fridays - Hat Pin Tutorial


Today is Fun Friday with Your Next Stamp. Yippee!

Visit here every Friday to Join in on the fun!
Today I created a Valentine's Day card using Curly Cutie.


I used my Glitter Spica Pen to dress little miss cutie up :) 


I added a Hat pin that I created myself. I love adding Hat Pins to my cards.  It is a very simple and easy DYI project anyone can do (steps on how to make these will follow below). I had these awesome silver rose engraved beads that were perfect for this card.


Read on for my Tips and Tricks. Today I'm going to share with you the steps I take to create the hat pins for my cards.

First, gather up your supplies.
*Hat pins 
*Beads
*Glossy Accents (used for an adhesive)
*Rubber Earring Stoppers 
*Left over brad foam holder 
and your imagination...


I purchase my Hat Pins from both Hobby Lobby and JoAnn's. There are different colors and sizes, so this depends on what you prefer. These are the types that I like using most.


Next, choose the beads you would like to use for your Hat Pin. I purchase all my beads at Hobby Lobby in the Jewelry making section. The colors and varieties are endless. The only rule in choosing, is to make sure the bead has a small hole on the ends. The Hat Pins are thin so you want a very small bead hole.

Once you have added the beads on the pin, add a dab of Glossy Accents on the pin itself. See The picture below. (you can click on pictures to see a larger version).


Next, Slid your beads across the Glossy Accents to the top of the pin, and as you do so, each bead will pick up some of the adhesive. Add a Earring stopper behind the beads to hold them in place for drying purposes. I purchased my Earring stoppers also at JoAnn's.


This will hold everything in place as it dries. Stick the pin into your leftover brad foam to dry.


Once the pin is dry, you can remove the earring stopper or slid it to the pointy end if you don't want to get poked. This can also remain on your pin when used on your project to prevent poking and catching.


Your pin is complete and ready to use!


Make sure you visit the YNS Blog today for other Fun Friday projects and tips. We will also will be having surprise giveaways, so check it out.

Thanks for visiting.

January 11, 2012

Your Next Stamp Hop and New Release!!


Blog Hop Starts: Wednesday, January 11th at 3:00AM (EST)
Blog Hop Ends: Monday, January 16th at midnight (EST)

Our release this week is really special. The stamps that we will be showcasing today were created by none other than our own Jenny Suchin - part of the Your Next Stamp Design Team.  She is amazingly talented  - you are all in for a real treat today!

If you arrived here from Jen D's Blog you are right on track. If not, you can start at the beginning of the hop at Jenny S's Blog.

Of course we have prizes too :) Winners will receive a stamp set of your choice from the New Jenny Design sets you will see along the hop. Make sure to take note of your favorites.  One of the YNS DT Members is a secret blogger, so you will have to leave comment on all the blogs if you want the best chance at winning. The winners will be post on the YNS Blog on January 17th.

We also have a special sale. Hop Specials – 15% off entire order – online code is YNSJAN2012

The stamp sets being released today are: 

Special Delivery (Elephant Set)
  Love is in the Air (Giraffe Set)
  Up Up and Away (Koala Set)
& Basket Animals (Balloon Basket with 5 Animals) 

The stamp set that I used for my card is called Love is in the Air.


I absolutely love this stamp set, and I will be using this over and over again, it's so fun! The Giraffe Pattern was cut by hand to create the Giraffe skin. This was my favorite part as I did not have Giraffe Skin DP lol.

As much as I would love to take credit for this design lol, it was not my idea. I CASE'd this wonderful card I found on the SplitCoast Gallery from stampwithkristine. Her card is amazing huh?

I added a little glitter with my Spica pens and some rhinestones.


I don't think I can create cards without adding glitter somewhere :)

I also added some Clouds and now Love is in the Air lol!


Your next stop on the hop is Maureen's Blog. Don't forget to leave a comment to qualify to win the Grand Prize! :)

Thanks for visiting.

ShareThis